
Surprise Craftertunity! : Beachside Paperweights
- Elise

- Jan 13, 2021
- 4 min read
Updated: Jan 19, 2021
In case you lost your directions or missed out on a kit, we have you covered. In this series, we will be showcasing past projects, in particular those that were originally released as Surprise Craftertunity kits at the library. So get ready to grab some spare materials and start crafting!
Beachside Paperweights

If you've ever wished you could bring a little summer into the middle of winter, or some of that lakeside fun, this paperweight might be just the answer to your prayers. This is your chance to make a mini beach scene just the way you want to remember it. Stick it on your desk or bookcase and all you have to do is look at it to feel that sun on your skin and sand between your toes.
Materials:

1 Mason jar lid (wide-mouth if you can get it) This, filled with the Plaster of Paris, will be your base/beach.
1 Cocktail Umbrella (optional but recommended) Who doesn't like a beach umbrella?
Mod Podge Although watered down Elmers will work almost as well
2 parts Plaster of Paris
1 part cool to cold water
Seashells
Small piece of printed fabric (optional) For use as a beach blanket.
Acrylic Paint (optional & not included in kit) If you want to paint some water lapping upwards or something else, this is your chance. Just wait until everything is dry first.
Paint Brush(es) (not included in kit) One for each purpose as you don't want to mix
Scissors (not included in kit) Necessary if making the beach blanket.
Disposable cup(s) (at least one, maybe more) (not included in kit)


Directions:
Before starting, make sure you have a clean surface that you don't mind getting a little dirty. If necessary, cover the area with newspaper &/or plastic. I used an old silpat baking sheet we no longer use.
If you are using the (beach) umbrella &/or fabric (beach towel), start here. Otherwise, skip to step 4:
Cut the fabric to the size/shape you want your mini beach blanket to be. Open your cocktail umbrella to the point you want it to stay. Take the Mod Podge and paint every surface of both objects.
If you don't want your blanket to be flat, arrange it in the position you want it to be in. Once it is dry, it will start to hold its shape.
Let both items dry. You will want to coat your items several times, allowing to dry after each coat, as this will not only help them to hold their shape but provide some extra strength to them. Cocktail umbrellas aren't known for being made of steel and we want this to last.
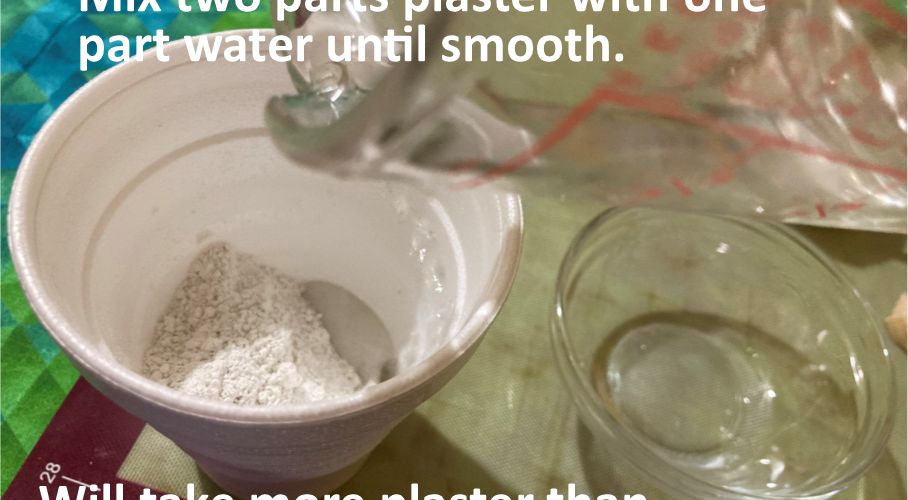
Mix your Plaster of Paris in a disposable cup. For every two parts plaster, add one part cool or cold water. Pour this into your mason jar lid until it reaches the top, just shy of the top. This will be the start to your sandy beach.
Let your base set just until the plaster starts to feel slightly gummy. Typically, you should start to see results within 10-20 minutes. I ended up testing every 5 minutes and it took at least 30 minutes. While you are waiting, you can figure out how you want to arrange your objects.
Start adding items onto your paperweight. Make sure to push them down slightly into the mixture so that they stay in place. As the plaster hardens, this will help hem grip. If you are using the umbrella, do this last and you might want to add a dab of Mod Podge after everything dries to the base of the umbrella just to add a little extra grip. If you put the umbrella in too soon, you will be stuck holding it in place while it dries or taking it out and gluing it in place afterwards as I did. If you put everything in too soon, you might find items sinking farther down than you intended, too late and you might not get them in at all.
If you want to take it to the next level:
Only after it is well and truly gummy can you start to create a few "lapping wave" ripples if you want. You don't have to. To do so, gently use your fingers to push some of the plaster towards the center, the lighter the pressure the better. Once it is dry, then you can paint thin layers of blue on to look like lapping water.
Whatever you do, you'll want to work relatively quickly. The plaster hardens usually in 20-30 minutes, unless you use too much water like I did, then it might take longer than that just to finish with step 6, although even once dry it will take two to three days to fully cure. Once everything is dry, you could paint some blue water coming partway up the ripples or some such. Otherwise, once it is cured it is permanent.
A stray thought, if you will: Another idea would be to make it look like a day reading at the beach by taking a small amount of scrap paper, cutting it into small rectangles, folding them together in half, coating everything in Mod Podge and arranging it on the blanket to look like a book caught in the wind. ... Sorry. I tend to have a mind for miniatures and can get a little too involved in all of the little details. The point is that you can do with it whatever you like and make it as simple or complicated as that entails. Also, I haven't tried the book idea, so if it doesn't work, I apologize.
Have fun and send us pictures of some of your creations! We'll post them on Facebook.
Notes on Plaster of Paris:
Plaster of Paris starts out as a fine powder that will fly EVERYWHERE given even a less than gentle jolt or a very slight breeze (I learned from the experience of having a leaky box), so despite it being a safe substance I would recommend some caution or you will be vacuuming it all up before you even begin.
Unlike many substances, Plaster of Paris is porous and does not shrink as it dries. Whatever level you fill your cover to it will remain. Forever. However, it does take more than you think because as you add water in, it shrinks down some. Make more than you think you'll need in a disposable cup.
Another method to make "beachy" paperweights would have you wait until summer and actually go to the beach. digging a hole in moist sand, decorating it however you will, and pouring the plaster in works just as well and will bag you a sandier paperweight to boot.


Comments